Affiliate Disclosure: Some links are affiliate links, meaning we may earn a commission if you purchase—at no extra cost to you. Prices and availability can change. We base our content on independent research, not direct input from manufacturers or utilities unless stated. Unless explicitly stated, we do not personally test every product. Our reviews are based on independent research, product documentation, and user/reviewer feedback.
Key Takeaways
- Home energy audits can identify efficiency problems and may qualify for a 30% tax credit under the Inflation Reduction Act.
- No-cost energy-saving strategies like strategic thermostat settings and eliminating phantom energy can reduce bills immediately.
- Budget-friendly upgrades under $100 (weatherstripping, LED bulbs) offer significant returns with minimal investment.
- Major upgrades like heat pumps and solar panels provide the biggest long-term savings but require careful financial planning.
- Government incentives can reduce upgrade costs by up to 30% through tax credits, rebates, and utility company programs.
Energy bills climbing again? You’re not alone. The average American household spends over $2,000 annually on energy costs—with much of that money literally disappearing through inefficient homes. The good news? You have more control over these costs than you might think, and Energy Upgrade Guide is here to help navigate your path to savngs.
Why Your Energy Bills Keep Climbing (And What You Can Do)
Energy prices have risen consistently over the past decade, but what many homeowners don’t realize is that up to 30% of their energy costs come from inefficiency rather than actual usage. Poor insulation, outdated appliances, and energy-wasting habits all contribute to unnecessarily high bills. The Department of Energy estimates that the typical family can reduce energy costs by 25-30% through targeted efficiency improvements—that’s $500-600 back in your pocket each year.
Understanding which areas of your home consume the most energy is the first step to making smart upgrade decisions. Heating and cooling typically account for about 46% of home energy use, followed by water heating (14%), appliances (13%), lighting (9%), and electronics (4%). By focusing your efforts on the biggest energy consumers first, you’ll maximize your savings while minimizing upfront costs.
Home Energy Audit: Your First Step to Massive Savings
Before spending a dime on upgrades, invest in a home energy audit. This comprehensive assessment identifies exactly where your home is losing energy and money. Professional energy auditors use specialized equipment like blower doors and infrared cameras to pinpoint air leaks, insulation gaps, and other efficiency problems invisible to the naked eye. Many homeowners discover they’ve been wasting hundreds of dollars annually on issues that are surprisingly inexpensive to fix.
How to Get a Free or Low-Cost Professional Audit
Professional energy audits typically cost between $100-$500, but you may not need to pay full price—or anything at all. Many utility companies offer free or heavily discounted energy assessments as part of their customer service programs. Additionally, the 2022 Inflation Reduction Act now provides a tax credit of up to 30% of the cost of home energy audits (maximum $150). Contact your utility provider first to ask about free assessments, then check with your state energy office about additional programs for which you might qualify.
DIY Home Energy Assessment Checklist
While professional audits provide the most comprehensive results, a DIY assessment can identify many common issues. Start by checking for air leaks around windows, doors, and electrical outlets using the “wet hand test”—wet your hand and pass it around frames to feel for drafts (DO NOT touch electrical outlets with wet hands). Next, inspect attic insulation—if you can see the joists, you need more. Check HVAC filters and replace them if dirty. Examine appliances and electronics for energy efficiency ratings, noting any that are over 10 years old. Document everything you find with photos and notes to create your energy improvement priority list.
5 No-Cost Ways to Cut Energy Bills Immediately
While planning for upgrades, implement these free strategies that can reduce energy consumption immediately without spending a penny. These habit changes alone can reduce your energy bills by 5-10% with absolutely no financial investment required.
1. Adjust Your Thermostat Settings Strategically
The Department of Energy estimates you can save up to 10% annually by setting your thermostat back 7-10°F from its normal setting for 8 hours per day. In winter, aim for 68°F when active and 60-65°F when sleeping or away. During summer, set your cooling to 78°F when home and 85°F when out. This simple adjustment can save $100-200 annually for the average household without sacrificing comfort once your body adjusts to the new normal temperatures.
2. Maximize Natural Heating and Cooling
Work with nature instead of against it by using your windows and blinds strategically. During winter days, open curtains on south-facing windows to let sunshine naturally heat your home, then close them at night to reduce heat loss. In summer, keep blinds closed during the day on sun-facing windows, and open windows at night when temperatures drop. Creating cross-ventilation by opening windows on opposite sides of your home can cool spaces naturally without running the AC.
3. Change Energy-Wasting Habits in the Kitchen
Your kitchen is home to some of your biggest energy consumers. Start by keeping refrigerator coils clean and setting the temperature between 35-38°F for the fridge and 0°F for the freezer. When cooking, match pot sizes to burner sizes and use lids to reduce cooking time. Avoid opening the oven door while cooking—each peek drops the temperature by 25°F, forcing the appliance to use more energy to recover. For small meals, choose a microwave, toaster oven, or air fryer instead of your full-sized oven to save up to 80% of the energy.
4. Optimize Laundry Routines for Energy Efficiency
Washing machines and dryers can account for up to 13% of household energy use, but simple habit changes can drastically reduce this consumption. Wash clothes in cold water whenever possible—up to 90% of washing machine energy goes toward heating water. Wait until you have full loads before running your machines, and clean the dryer’s lint filter before every cycle to improve air circulation. When weather permits, skip the dryer entirely and let clothes air dry on a rack or line, saving approximately $0.45 per load.
5. Eliminate Phantom Energy Drain
Did you know that plugged-in electronics consume electricity even when turned off? This “phantom” or “vampire” energy can account for up to 10% of your electricity bill. Unplug chargers when not in use, and connect entertainment centers and home office equipment to power strips that can be completely switched off. Pay special attention to devices with remote controls, continuous displays, or external power supplies—these are typically the worst phantom energy offenders.
Budget-Friendly Energy Upgrades Under $100
Once you’ve implemented no-cost strategies, it’s time to consider low-cost upgrades that deliver outsized returns. These affordable improvements typically pay for themselves within 3-12 months while continuing to save you money for years to come. Consider starting with the options that address your specific home’s biggest energy losses as identified in your energy audit.
Smart Power Strips: The Simple Way to Stop Vampire Energy Loss
Advanced power strips automatically cut power to peripheral devices when a main device is turned off. For example, when you turn off your TV, the strip also cuts power to your gaming console, DVD player, and soundbar. These smart strips typically cost $20-40 and can save $50-100 annually by eliminating phantom energy use across your home. For maximum impact, install them in entertainment centers and home offices where multiple devices are connected.
LED Lighting Conversion: Where to Start for Biggest Impact
LED bulbs use up to 90% less energy than incandescent bulbs and last 15-25 times longer, making them one of the easiest and most impactful energy upgrades. A typical LED bulb saves about $55 in electricity over its lifetime. Rather than replacing all bulbs at once, start with the fixtures you use most frequently—kitchen lights, living room lamps, and outdoor security lighting—to maximize your initial return on investment.
When shopping for LEDs, pay attention to lumens (brightness) rather than watts, and choose color temperatures that match your preferences: 2700K-3000K for warm, cozy light or 4000K-5000K for brighter, more energizing illumination. Many utility companies offer instant rebates on LED purchases, bringing prices down to as little as $1-2 per bulb.
Weatherstripping: Seal Air Leaks Without Breaking the Bank
Air leaks around doors and windows can waste 10-30% of your home’s heating and cooling energy. Self-adhesive weatherstripping is an inexpensive solution that even novice DIYers can install in an afternoon. V-strip weatherstripping works well for the sides of doors and windows, while door sweeps seal the gap at the bottom of exterior doors.
For visible gaps larger than ¼ inch, use expandable foam sealant, especially around areas where pipes or wires enter your home. Caulk is perfect for sealing cracks in stationary building components like window frames and baseboards. A complete weatherstripping kit typically costs $20-50 and can save $50-150 annually on heating and cooling costs.
Don’t overlook less obvious air leak sources like electrical outlets and switch plates on exterior walls. Foam gaskets designed specifically for outlets cost about $0.50 each and install in seconds, but can significantly reduce drafts, especially in older homes.
After weatherstripping, verify your work using the “dollar bill test”—close a door or window on a dollar bill, then try to pull it out. If it slides out easily, you need more weatherstripping in that location.
- Doors: Focus on weatherstripping the entire perimeter and adding a door sweep at the bottom
- Windows: Apply weatherstripping between the sash and frame
- Attic hatches: Add foam weatherstripping around the perimeter
- Electrical outlets: Install pre-cut foam gaskets behind cover plates
- Plumbing penetrations: Seal with expandable foam
Low-Flow Fixtures: Cut Water Heating Costs in Half
Water heating accounts for about 14% of home energy use, but low-flow fixtures can dramatically reduce this consumption without sacrificing performance. Modern low-flow showerheads use 1.5-2.0 gallons per minute (compared to the standard 2.5+ gallons) while maintaining good water pressure through aeration technology. At around $15-30 each, these fixtures typically pay for themselves within 3-4 months through reduced water and water heating costs.
Mid-Range Investments with Fast Payback Periods
If you’ve got a bit more to invest, these medium-cost upgrades deliver substantial energy savings with reasonable payback periods of 1-3 years. The Consumer Energy Alliance recommends prioritizing these improvements after addressing the basics, as they often provide the ideal balance between upfront cost and long-term savings for most homeowners.
Smart Thermostats: Actual Savings vs. Manufacturer Claims
Smart thermostats like those from Nest, Ecobee, and Honeywell typically cost $150-250 but can reduce heating and cooling costs by 8-15% by learning your schedule and preferences. While manufacturers sometimes claim higher savings, independent studies show the typical household saves $50-150 annually, creating a payback period of 1-3 years. The real advantage comes from their ability to automatically adjust temperatures based on occupancy patterns and weather forecasts—something most people forget to do manually.
Federal Tax Credits Available Now
The Inflation Reduction Act of 2022 dramatically expanded tax incentives for home energy improvements. Through 2032, homeowners can claim a 30% tax credit (up to $1,200 annually) for energy efficiency upgrades like insulation, windows, doors, and heat pumps. For solar installations, the credit jumps to 30% with no maximum limit. Even energy audits now qualify for a 30% credit (up to $150), making professional assessments much more affordable.
Unlike tax deductions, these credits reduce your tax bill dollar-for-dollar, making them incredibly valuable. Keep detailed records and receipts of all qualifying improvements, and use IRS Form 5695 when filing. Remember that most credits reset annually, so spreading larger projects across tax years can maximize your benefits.
State and Local Energy Efficiency Programs
Beyond federal incentives, most states offer their own rebate programs, low-interest loans, and additional tax credits for energy upgrades. California’s TECH Clean California initiative provides up to $3,000 for heat pump installations, while New York offers 25% tax credits (up to $5,000) for energy efficiency improvements through NY-Sun. Even smaller states like Rhode Island provide no-interest loans up to $25,000 for qualifying energy projects.
To find programs in your area, visit the Database of State Incentives for Renewables & Efficiency (DSIRE) at dsireusa.org and enter your zip code. Many programs have limited funding allocated annually, so applyyeahing early in the year increases your chances of approval.
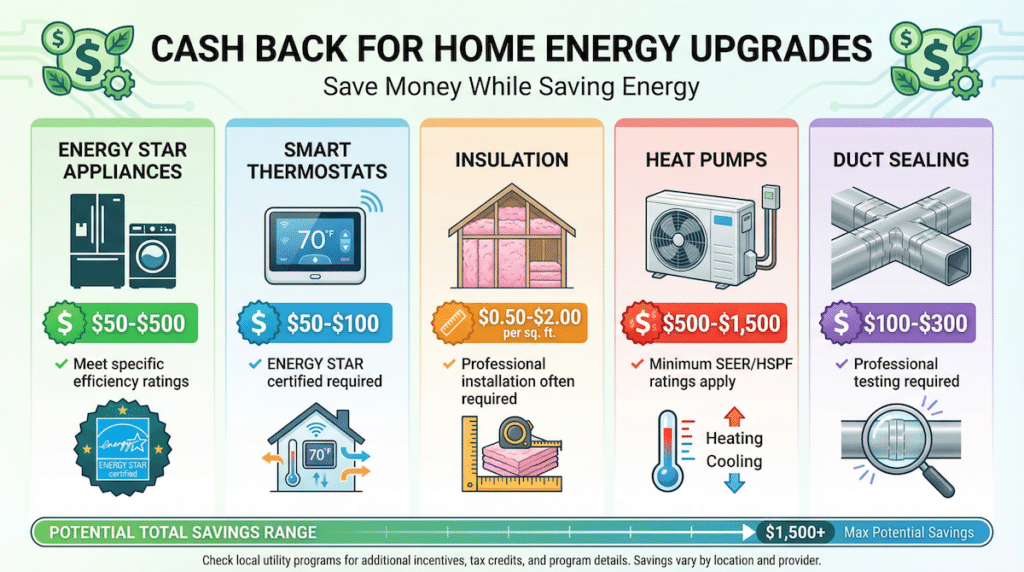
Utility Company Rebates You Might Not Know About
Your local utility company likely offers substantial rebates for energy-efficient upgrades—many homeowners leave hundreds or even thousands of dollars on the table by not investigating these opportunities. Most utility providers offer rebates for ENERGY STAR appliances, smart thermostats, insulation improvements, and HVAC upgrades. These rebates are typically provided as instant discounts, bill credits, or direct checks to customers.
Some utilities even provide free products to encourage energy efficiency. For example, Pacific Gas & Electric offers free smart thermostats to qualifying customers, while Duke Energy provides free LED bulbs and water-saving devices. Many companies also run seasonal promotions with enhanced rebates during periods of peak demand, particularly for cooling equipment in summer months.
The application process varies by utility but generally requires proof of purchase and sometimes professional installation. For larger projects like HVAC replacements, most utilities require applications before work begins, so always check requirements before making purchases. When combined with federal and state incentives, utility rebates can reduce upgrade costs by 50% or more.
Track Your Progress: How to Measure Energy Savings
After implementing energy upgrades, tracking your actual savings helps validate your investments and identify additional opportunities. The simplest method is comparing your current utility bills to those from the same month in previous years, accounting for weather differences and rate changes. Most utility companies provide year-over-year usage comparisons on their websites or apps, making this analysis straightforward.
Sample Tracking Spreadsheet: Create a simple spreadsheet with columns for Month/Year, kWh Used, Cost, Weather (HDD/CDD), Upgrades Completed, and Notes. Track your usage monthly and calculate percentage improvements over time. This visual record helps identify seasonal patterns and quantify the impact of specific upgrades.
For more accurate analysis, use “degree days” to normalize for weather variations. Heating Degree Days (HDD) and Cooling Degree Days (CDD) data is freely available online and helps account for temperature differences when comparing energy usage across years. A 5% reduction in weather-normalized usage represents real efficiency improvements regardless of whether the winter was mild or severe.
When calculating ROI on specific upgrades, factor in maintenance savings and longevity benefits beyond just energy cost reductions. For example, a new ENERGY STAR refrigerator might save $50 annually in electricity but also eliminates potential repair costs for an aging unit and may offer improved food preservation, reducing waste.
Tools to Monitor Real-Time Energy Usage
Real-time energy monitoring provides immediate feedback on consumption patterns and helps identify energy hogs in your home. Simple plug-in energy meters like the Kill-A-Watt measure individual appliance consumption, revealing surprising energy users like old freezers, gaming systems, and dusty entertainment centers. For whole-home monitoring, systems like Sense and Emporia Vue connect to your electrical panel and track usage by circuit or even individual devices.
Many utility companies now offer free smart meter programs with online dashboards showing hourly consumption data. Some even provide notifications when usage spikes or when you’re approaching a higher rate tier. This granular data helps pinpoint exactly when and where energy is being consumed, making it easier to adjust habits and verify the impact of efficiency improvements.
Understanding Your Energy Bill
Your utility bill contains valuable data beyond just the amount due. Most bills break down usage into tiers with different rates, show your consumption history, and may include comparisons to similar homes in your area. Pay attention to the “base charges” versus usage charges—fixed fees that don’t change regardless of consumption can affect your payback calculations for efficiency upgrades.
If your bill seems unusually high, look for notes about estimated readings (versus actual meter readings), rate changes, or billing period variations. Some utilities use longer billing periods during peak seasons, making bills appear higher when actually representing more days of service. Understanding these nuances helps identify genuine efficiency problems versus billing anomalies.
Start Saving Today: Your Energy-Efficiency Action Plan
Begin your energy-saving journey by implementing this three-phase approach: Start with the free behavior changes outlined earlier, which can reduce energy use by 5-10% immediately. Then invest in low-cost upgrades like weatherstripping, LEDs, and smart power strips, which typically pay for themselves within months. Finally, plan for larger investments like insulation, appliance upgrades, and HVAC improvements, prioritizing based on your energy audit results and available incentives.
Remember that energy efficiency is a marathon, not a sprint. Even small improvements compound over time, and the perfect shouldn’t be the enemy of the good. Every kilowatt-hour saved benefits both your wallet and the planet. Start where you can, track your results, and reinvest your savings into further improvements for a virtuous cycle of increasing efficiency and decreasing costs.
Frequently Asked Questions
After helping hundreds of homeowners improve their energy efficiency, I’ve found these are the most common questions that arise when planning home energy upgrades.
How much can I realistically save with energy-efficient upgrades?
Most households can reduce energy consumption by 25-30% through comprehensive efficiency improvements. For the average American home spending $2,000 annually on energy, that’s $500-600 in annual savings. Your specific savings will depend on your current home efficiency, local energy rates, and which improvements you implement.
The largest savings typically come from optimizing your home’s thermal envelope (insulation, air sealing) and upgrading major systems like heating, cooling, and water heating. For example, proper insulation alone can reduce heating and cooling costs by 15-20%, while a high-efficiency heat pump can cut HVAC energy use by 30-50% compared to resistance electric heating.
Behavior changes and small upgrades offer more modest but immediate returns. Using a programmable thermostat correctly saves about 10% on heating and cooling, while switching to LEDs reduces lighting electricity by up to 90%. The cumulative effect of many small changes often delivers surprising results—my neighbor documented a 17% reduction in energy use just from eliminating phantom loads and optimizing thermostat settings.
- Basic improvements (behavioral changes, weatherstripping, LEDs): 5-15% savings
- Moderate upgrades (smart thermostats, ceiling fans, added insulation): 15-25% savings
- Comprehensive retrofits (HVAC replacement, solar, envelope sealing): 25-50%+ savings
- New construction designed for efficiency: 50-80% savings compared to code minimum
- Net-zero homes: 100% reduction in net energy costs with renewable generation
Which home energy upgrade has the fastest payback period?
LED lighting consistently offers the fastest payback, typically recovering costs in 3-6 months while delivering 5-10 years of energy savings. Other quick-return upgrades include weatherstripping (6-12 month payback), smart power strips (8-12 month payback), and programmable thermostats (1-2 year payback). When accounting for available rebates and tax credits, these payback periods can shrink even further—I’ve seen utility rebates that make LEDs effectively free, providing immediate return on investment.
Are smart home devices worth the investment for energy savings?
Smart devices deliver varying returns depending on how they’re used. Smart thermostats consistently provide good value, saving 8-15% on heating and cooling costs with minimal behavior change required. Smart plugs and switches help reduce phantom loads but require more active management to maximize savings. The true value of smart home technology often comes from automation—devices that adjust based on occupancy, weather, and time of day save more than those requiring manual intervention. For maximum return, focus on controlling your largest energy consumers first: HVAC systems, water heaters, and major appliances.
How do I know if my home needs more insulation?
Several telltale signs indicate insufficient insulation: rooms that feel too hot or cold regardless of thermostat settings, high heating/cooling bills, ice dams on roofs in winter, and significant temperature differences between floors. The simplest DIY check is examining your attic—if you can see floor joists above the insulation, you need more. Current recommendations call for R-49 to R-60 in attics for most climate zones (roughly 16-20 inches of fiberglass batts).
For wall insulation, an infrared camera can reveal cold spots indicating insulation gaps, though these typically require professional assessment. Many utility companies offer thermal imaging as part of their energy audit programs, often at no cost to customers. Remember that insulation works together with air sealing—even the best insulation underperforms if air leaks around it.
Can renters make energy-efficient improvements to their homes?
Absolutely! While renters may not be able to modify structural elements, many effective energy-saving strategies require no permanent changes. Start with behavioral adjustments like thermostat management and phantom load reduction. Then consider removable improvements like LED bulbs, smart plugs, window film, and door draft stoppers. Most landlords allow these modifications, especially when you offer to leave efficiency upgrades in place when moving out.
For more substantial improvements, engage your landlord in conversation about shared benefits. Many property owners are receptive to efficiency upgrades that increase property value and reduce maintenance costs, particularly when informed about available rebates and incentives. I’ve seen tenants successfully negotiate rent adjustments in exchange for purchasing and installing programmable thermostats or ENERGY STAR appliances that benefit both parties.
Remember that energy efficiency is both a journey and an investment—one that pays continuous dividends in comfort, savings, and environmental impact. By addressing your home’s unique energy profile with targeted improvements and smart habits, you’re not just reducing bills today but building resilience against rising energy costs for years to come.
Affiliate Disclosure: Some links are affiliate links, meaning we may earn a commission if you purchase—at no extra cost to you. Prices and availability can change. We base our content on independent research, not direct input from manufacturers or utilities unless stated. Unless explicitly stated, we do not personally test every product. Our reviews are based on independent research, product documentation, and user/reviewer feedback.